1、teleport是什么 teleport,字面意思就是远距离传送 ,我们可以把它理解为传送门的意思。
大家都知道,传送门的意思就是从一个地方传送到了另外一个地方。而 vue3 为什么要用 teleport 来表达呢?
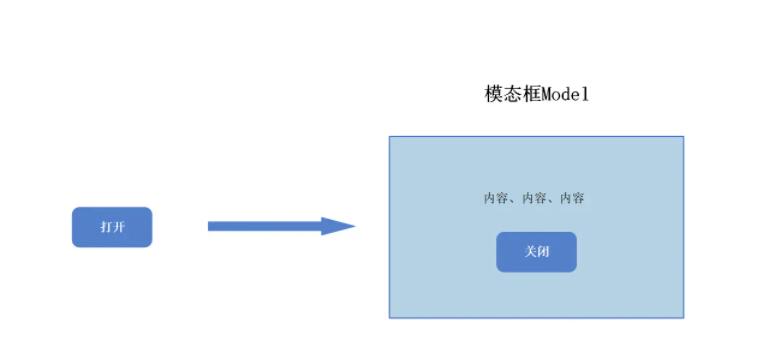
其实,有一个非常常见的需求就是,我们经常要通过点击一个按钮,来实现模态框的效果。而在 vue3 之前,我们基本上控制它都是点击后上下会形成一个父子组件 的关系,这样子感觉独立性就没有那么强了。
通过这样的解释,相信大家对 teleport 有了一个基础的认识。
1.2、实现模态框功能 接下来我们就来用这个功能,实现一个模态框,控制组件的显示和隐藏。
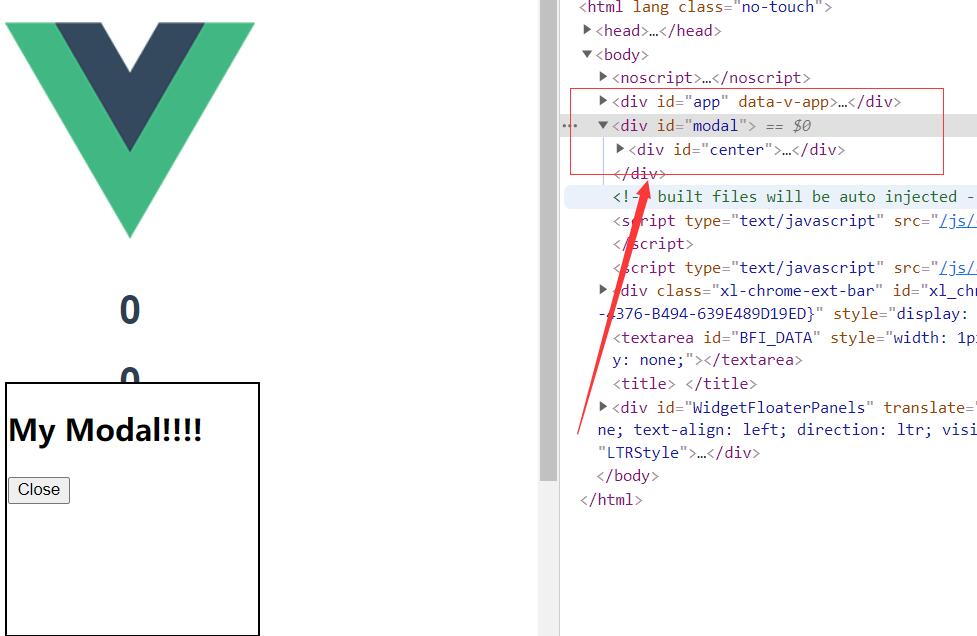
(1)设置锚点 我们现在 vue3 项目下的 /public/index.html 设置一个锚点,来放置组件的内容。具体代码如下:
1 2 3 4 5 6 7 8 9 10 11 12 <body > <noscript > </noscript > <div id ="app" > </div > <div id ="modal" > </div > </body >
(2)定义子组件 接下来我们在 /src/components 下定义一个子组件,命名为 Modal.vue 。具体代码如下:
1 2 3 4 5 6 7 8 9 10 11 12 13 14 15 16 17 18 19 20 21 22 23 24 25 26 27 28 29 30 31 32 33 34 35 36 37 38 39 40 41 42 43 44 45 <template > <teleport to ="#modal" > <div id ="center" v-if ="isOpen" > <h2 > <slot > this is a modal</slot > </h2 > <button @click ="buttonClick" > Close</button > </div > </teleport > </template > <script lang ="ts" > import { defineComponent } from "vue" ;export default defineComponent({ isOpen: Boolean , "close-modal" : null , setup (props, context ) const buttonClick = () => { context.emit("close-modal" ); return { </script > <style > width : 200px ; height : 200px ; border : 2px solid black; background : white; position : fixed; left : 50% ; right : 50% ; top : 50% ; margin-left : -100px ; </style >
(3)定义父组件 之后我们再来定义一个父组件,命名为 index.vue 。具体代码如下:
1 2 3 4 5 6 7 8 9 10 11 12 13 14 15 16 17 18 19 20 21 22 23 24 25 26 27 28 29 30 31 32 33 34 35 36 <template > <button class ="btn1" @click ="openModal" > 打开模态框</button > <modal :isOpen ="modalIsOpen" @close-modal ="onModalClose" > </modal > </template > <script lang ="ts" > import { ref, defineComponent} from 'vue' import Modal from './components/Modal.vue' export default defineComponent({ name: 'App' , setup ( const modalIsOpen = ref(false ) const openModal = () => { modalIsOpen.value = true const onModalClose = () => { modalIsOpen.value = false return { </script >
在上面的案例中,我们学习到了通过使用 vue3 新推出的 teleport 特性,将组件渲染到另外一个 DOM 节点的方法,这样使得组件之间的独立性更强。
2.用Suspense发起一个异步请求 1、Suspense是什么 我们都知道,在 web 世界中,经常遇到很多的异步请求困境。在发起异步请求时,我们往往需要去判断这些异步请求的状态,然后呢,根据这些请求来展示不同的界面。
那现在呢, vue3 推出了一个新的内置组件 Suspense , Suspense 是一个特殊的组件,它会有两个 template slot ,刚开始会渲染 fallback 内容,直到达到某个条件以后,才会渲染正式的内容,也就是 default 的内容。这样呢,进行异步内容的渲染就会变得特别简单。
同时值得注意的是,如果使用 Suspense ,要返回一个 promise 而不是一个对象。
2、用Suspense发起一个异步请求 接下来我们使用 Suspense 来发起一个异步请求。
首先我们在项目下定义一个子组件,命名为 AsyncShow.vue ,具体代码如下:
1 2 3 4 5 6 7 8 9 10 11 12 13 14 15 16 17 18 19 20 21 22 23 <template > <div > <h1 > {{ result }} </h1 > </div > </template > <script lang ="ts" > import { defineComponent } from "vue"; export default defineComponent({ setup() { return new Promise((resolve) => { setTimeout(() => { return resolve({ result: 42, }); }, 3000); }); }, }); </script > <style > </style >
之后在项目下再定义一个父组件,命名为 DogShow.vue ,具体代码如下:
1 2 3 4 5 6 7 8 9 10 11 12 13 14 15 16 17 18 19 20 21 22 23 24 25 26 27 <template > <div id ="app" > <Suspense > <template #default > <async-show /> </template > <template #fallback > <h1 > Loading !...</h1 > </template > </Suspense > </div > </template > <script lang ="ts" > import { defineComponent } from 'vue' import AsyncShow from './components/AsyncShow.vue' export default defineComponent({ name: 'App' , setup ( </script >
最终浏览器的显示效果为:3秒后loading…变为42
3、用Suspense发起多个异步请求 我们不满足于现状,且互联网千奇百怪的,我们总不能一直只发送一个异步请求吧!所以,接下来我们就来实现发起多个异步请求的效果。
首先我们用一个免费的在线API ,来发起一个请求。接下来我们在项目的 components 文件下,再定义一个子组件,命名为 DogShow.vue ,具体代码如下:
1 2 3 4 5 6 7 8 9 10 11 12 13 14 15 <template > <img :src ="result && result.message" > </template > <script lang ="ts" > import axios from 'axios' import { defineComponent } from 'vue' export default defineComponent({ async setup ( const rawData = await axios.get('https://dog.ceo/api/breeds/image/random' ) return { </script >
参考文章 接下来我们再把以上子组件的内容添加到父组件中,具体代码如下:
1 2 3 4 5 6 7 8 9 10 11 12 13 14 15 16 17 18 19 20 21 22 23 24 25 26 27 28 <template > <div id ="app" > <Suspense > <template #default > <async-show /> <dog-show /> <template #fallback > <h1 > Loading !...</h1 > </template > </Suspense > </div > </template > <script lang ="ts" > import AsyncShow from './components/AsyncShow.vue' import DogShow from './components/DogShow.vue' export default { name: 'App' , setup ( </script >
大家可以看到,我们同时发起了两个异步请求,并且在Suspense中的default插槽里面同时使用。同样的,浏览器会先显示fallback的内容,之后等到时机到了,就显示我们请求的内容。
依据这样的例子,显示更多的请求也同样有效。这样对比起来,发送多个异步请求是不是就方便了许多。
2.1、如何抓取错误 学完上面的内容,相信大家对Suspense的用法已经有所了解。那么,网络请求千奇百怪的,总不能每次都能够很顺畅的发起请求对吧。所以呢,我们来需要再来学习一下,当网络请求失败时,如何抓取Supsense包裹下的错误。
这个时候我们可以使用一个钩子函数,这个函数叫做 onErrorCaptured ,接下来我们来看下怎么抓取。
我们将父组件 index.vue 进行改造,具体代码如下:
1 2 3 4 5 6 7 8 9 10 11 12 13 14 15 16 17 18 19 20 21 22 23 24 25 26 27 28 29 30 31 32 33 34 35 36 37 <template > <div id ="app" > <p > {{error }} </p > <Suspense > <template #default > <async-show /> <dog-show /> <template #fallback > <h1 > Loading !...</h1 > </template > </Suspense > </div > </template > <script lang ="ts" > import { onErrorCaptured } from 'vue' import AsyncShow from './components/AsyncShow.vue' import DogShow from './components/DogShow.vue' export default { name: 'App', components: { AsyncShow, DogShow }, setup() { const error = ref(null) onErrorCaptured((e: any) => { error.value = e return true }) return{ error } } }; </script >
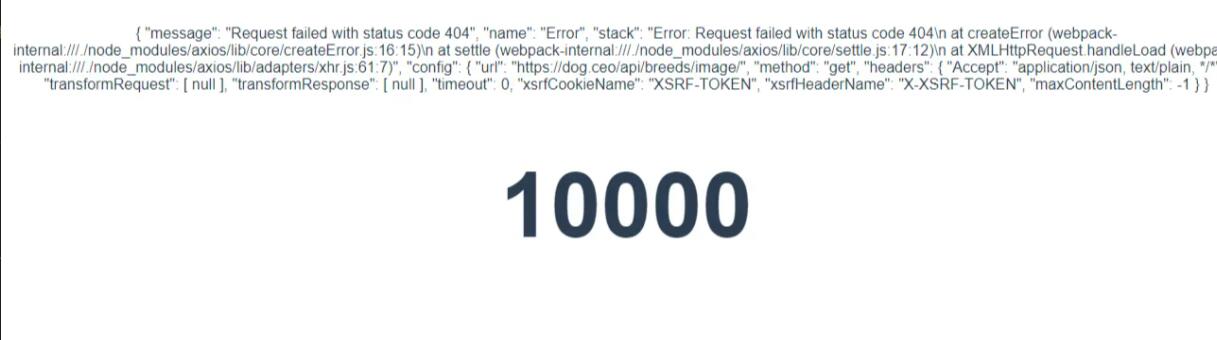
此时我们再将 DogShow.vue 的接口进行修改,让其变成一个无效的API。代码如下:
1 const rawData = await axios.get ('https://dog.ceo/api/breeds/image' )
接下来我们就来看一下浏览器的运行效果: onErrorCaptured 这个生命周期捕捉到的错误,清晰明了。
参考文章 vue3的传送门teleport究竟有多神奇?suspense发起异步请求有多简约?