四、TypeScript 函数
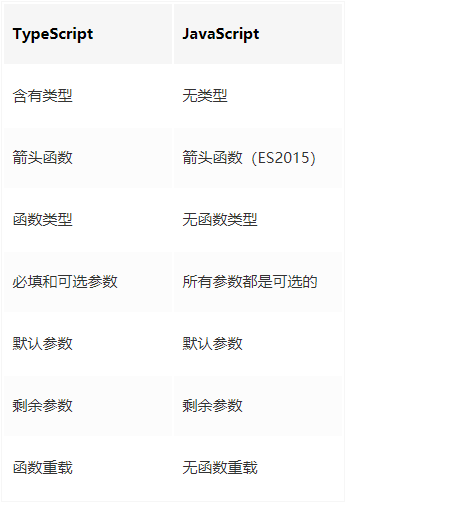
TypeScript 函数与 JavaScript 函数的区别
箭头函数
1.常见语法
1 2 3 4 5 6 7 8 9 10 11 myBooks.forEach(() =>console .log('reading' ));console .log(title));(title, idx, arr) =>console .log(idx + '-' + title);(title, idx, arr) =>console .log(idx + '-' + title);
2.使用示例
1 2 3 4 5 6 7 8 9 10 11 12 13 14 15 16 function Book (let self = this ;2016 ;setInterval (function (console .log(self.publishDate);1000 );function Book (this .publishDate = 2016 ;setInterval (() => {console .log(this .publishDate);1000 );
参数类型和返回类型
1
2
3
function createUserId(name : string , id : number ): string {return name + id ;
函数类型
1
2
3
4
5
6
7
let IdGenerator: (chars : string , nums : number ) => string ;function createUserId(name : string , id : number ) : string {
可选参数及默认参数
1
2
3
4
5
6
7
8
9
10
11
12
13
// 可选参数function createUserId(name : string , id : number , age?: number ): string {return name + id ;function createUserId( name : string = "Semlinker" , id : number , number string {return name + id ;
在声明函数时,可以通过 ? 号来定义可选参数,比如 age?: number 这种形式。在实际使用时,需要注意的是可选参数要放在普通参数的后面,不然会导致编译错误。
剩余参数
1
2
3
4
5
6
7
8
function push (array, ...items ) function (item) 1 , 2 , 3 );
函数重载
函数重载或方法重载是使用相同名称和不同参数数量或类型创建多个方法的一种能力。要解决前面遇到的问题,方法就是为同一个函数提供多个函数类型定义来进行函数重载,编译器会根据这个列表去处理函数的调用。
1
2
3
4
5
6
7
8
9
10
function add (a : number, b : number): number ;function add (a : string, b : string): string ;function add (a : string, b : number): string ;function add (a : number, b : string): string ;function add (a : Combinable, b : Combinable) {if (typeof a === "string" || typeof b === "string" ) {return a .toString () + b .toString ();return a + b ;
在以上代码中,我们为 add 函数提供了多个函数类型定义,从而实现函数的重载。之后,可恶的错误消息又消失了,因为这时 result 变量的类型是 string 类型。在 TypeScript 中除了可以重载普通函数之外,我们还可以重载类中的成员方法。
方法重载是指在同一个类中方法同名,参数不同(参数类型不同、参数个数不同或参数个数相同时参数的先后顺序不同),调用时根据实参的形式,选择与它匹配的方法执行操作的一种技术。所以类中成员方法满足重载的条件是:在同一个类中,方法名相同且参数列表不同。下面我们来举一个成员方法重载的例子:
1
2
3
4
5
6
7
8
9
10
11
12
13
14
15
class Calculator number , b : number ): number ;string , b : string ): string ;string , b : number ): string ;number , b : string ): string ;add (a: Combinable, b: Combinable )if (typeof a === "string" || typeof b === "string" ) {return a.toString() + b.toString();return a + b;const calculator = new Calculator();const result = calculator.add("Semlinker" , " Kakuqo" );
这里需要注意的是,当 TypeScript 编译器处理函数重载时,它会查找重载列表,尝试使用第一个重载定义。 如果匹配的话就使用这个。 因此,在定义重载的时候,一定要把最精确的定义放在最前面。另外在 Calculator 类中,add(a: Combinable, b: Combinable){ } 并不是重载列表的一部分,因此对于 add 成员方法来说,我们只定义了四个重载方法。
ypeScript 数组
8.1 数组解构
1
2
3
let x: number ; let y: number ; let z: number ;let five_array = [0 ,1 ,2 ,3 ,4 ];
8.2 数组展开运算符
1
2
let two_array = [0 , 1 ];let five_array = [...two_array, 2 , 3 , 4 ];
8.3 数组遍历
1
2
3
4
let colors: string [] = ["red" , "green" , "blue" ];for (let i of colors) {log (i);
TypeScript 对象
9.1 对象解构
1
2
3
4
5
6
let person = { name : "Semlinker" ,"Male" ,let { name , gender } = person;
9.2 对象展开运算符
1
2
3
4
5
6
7
8
9
10
11
let person = {"Semlinker" ,"Male" ,"Xiamen" ,let personWithAge = { ... person, age: 33 };let { name, ... rest } = person;
五、TypeScript 接口 在面向对象语言中,接口是一个很重要的概念,它是对行为的抽象,而具体如何行动需要由类去实现。
TypeScript 中的接口是一个非常灵活的概念,除了可用于对类的一部分行为进行抽象以外,也常用于对「对象的形状(Shape)」进行描述。
10.1 对象的形状
1
2
3
4
5
6
7
8
9
interface Person { name: string; age: number; name: "Semlinker" , age: 33 ,
10.2 可选 | 只读属性
1
2
3
4
interface Person {readonly name: string ;number ;
只读属性用于限制只能在对象刚刚创建的时候修改其值。此外 TypeScript 还提供了 ReadonlyArray 类型,它与 Array 相似,只是把所有可变方法去掉了,因此可以确保数组创建后再也不能被修改。
1
2
3
4
5
6
7
let a: number[] = [1 , 2 , 3 , 4 ];0 ] = 12 ; // error!5 ); // error!100 ; // error!// error!
六、TypeScript 类 11.1 类的属性与方法
在 TypeScript 中,我们可以通过 Class 关键字来定义一个类:
1
2
3
4
5
6
7
8
9
10
11
12
13
14
15
16
17
18
19
20
21
22
23
class Greeter static cname: string = "Greeter" ;string ;constructor (message: string )this .greeting = message;static getClassName (return "Class name is Greeter" ;greet (return "Hello, " + this .greeting;let greeter = new Greeter("world" );
那么成员属性与静态属性,成员方法与静态方法有什么区别呢?这里无需过多解释,我们直接看一下以下编译生成的 ES5 代码:
1
2
3
4
5
6
7
8
9
10
11
12
13
14
15
16
17
18
19
"use strict" ;var Greeter = (function (function Greeter (message ) this .greeting = message;function (return "Class name is Greeter" ;function (return "Hello, " + this .greeting;"Greeter" ;return Greeter;var greeter = new Greeter("world" );
11.2 访问器
1
2
3
4
5
6
7
8
9
10
11
12
13
14
15
16
17
18
19
20
21
22
23
let passcode = "Hello TypeScript" ;class Employee private _fullName: string ;get fullName (): string {return this ._fullName;set fullName (newName: string ) {if (passcode && passcode == "Hello TypeScript" ) {this ._fullName = newName;else {console .log("Error: Unauthorized update of employee!" );let employee = new Employee();"Semlinker" ;if (employee.fullName) {console .log(employee.fullName);
11.3 类的继承
继承是一种 is-a 关系:
在 TypeScript 中,我们可以通过 extends 关键字来实现继承:
1
2
3
4
5
6
7
8
9
10
11
12
13
14
15
16
17
18
19
20
21
22
23
24
25
class Animal string ;constructor (theName: string )this .name = theName;move (distanceInMeters: number = 0 )console .log(`${this .name} moved ${distanceInMeters} m.` );class Snake extends Animal constructor (name: string )super (name);move (distanceInMeters = 5 )console .log("Slithering..." );super .move(distanceInMeters);let sam = new Snake("Sammy the Python" );
11.4 ECMAScript 私有字段
1
2
3
4
5
6
7
8
9
10
11
12
13
14
15
16
17
18
class Person string ;constructor (name: string )this .#name = name;greet (console .log(`Hello, my name is ${this .#name} !` );let semlinker = new Person("Semlinker" );
与常规属性(甚至使用 private 修饰符声明的属性)不同,私有字段要牢记以下规则:
私有字段以 # 字符开头,有时我们称之为私有名称;
每个私有字段名称都唯一地限定于其包含的类;
不能在私有字段上使用 TypeScript 可访问性修饰符(如 public 或 private);
私有字段不能在包含的类之外访问,甚至不能被检测到。
七、TypeScript 泛型 软件工程中,我们不仅要创建一致的定义良好的 API,同时也要考虑可重用性。 组件不仅能够支持当前的数据类型,同时也能支持未来的数据类型,这在创建大型系统时为你提供了十分灵活的功能。
在像 C# 和 Java 这样的语言中,可以使用泛型来创建可重用的组件,一个组件可以支持多种类型的数据。 这样用户就可以以自己的数据类型来使用组件。
设计泛型的关键目的是在成员之间提供有意义的约束,这些成员可以是:类的实例成员、类的方法、函数参数和函数返回值。
泛型(Generics)是允许同一个函数接受不同类型参数的一种模板。相比于使用 any 类型,使用泛型来创建可复用的组件要更好,因为泛型会保留参数类型。
12.1 泛型接口
1
2
3
4
interface GenericIdentityFn <T > {
12.2 泛型类
1
2
3
4
5
6
7
8
9
10
class GenericNumber <T > (x: T, y: T ) => T;let myGenericNumber = new GenericNumber<number >();0 ;function (x, y ) return x + y;
12.3 泛型变量
对刚接触 TypeScript 泛型的小伙伴来说,看到 T 和 E,还有 K 和 V 这些泛型变量时,估计会一脸懵逼。其实这些大写字母并没有什么本质的区别,只不过是一个约定好的规范而已。也就是说使用大写字母 A-Z 定义的类型变量都属于泛型,把 T 换成 A,也是一样的。下面我们介绍一下一些常见泛型变量代表的意思:
在T(Type):表示一个 TypeScript 类型
K(Key):表示对象中的键类型
V(Value):表示对象中的值类型
E(Element):表示元素类型
12.4 泛型工具类型
1.typeof
在 TypeScript 中,typeof 操作符可以用来获取一个变量声明或对象的类型。
1
2
3
4
5
6
7
8
9
10
11
12
13
interface Person {string ;number ;const sem: Person = { name : 'semlinker' , age : 30 };type Sem= typeof sem; function toArray (x: number ): Array <number > return [x];type Func = typeof toArray;
2.keyof
keyof 操作符可以用来一个对象中的所有 key 值:
1
2
3
4
5
6
7
8
interface Person {string ;number ;type K1 = keyof Person; // "name" | "age" type K2 = keyof Person[]; // "length" | "toString" | "pop" | "push" | "concat" | "join" type K3 = keyof { [x: string ]: Person }; // string | number
3.in
in 用来遍历枚举类型:
1
2
3
4
5
type Keys = "a" | "b" | "c" type Obj = {in Keys ]: any any , b: any , c: any }
4.infer
在条件类型语句中,可以用 infer 声明一个类型变量并且对它进行使用。
1
2
3
type ReturnType<T> = T extends (any []any ;
以上代码中 infer R 就是声明一个变量来承载传入函数签名的返回值类型,简单说就是用它取到函数返回值的类型方便之后使用。
5.extends
有时候我们定义的泛型不想过于灵活或者说想继承某些类等,可以通过 extends 关键字添加泛型约束。
1
2
3
4
5
6
7
8
interface ILengthwise {number ;function extends ILengthwise>(arg: T): T {log (arg.length);return arg;
现在这个泛型函数被定义了约束,因此它不再是适用于任意类型:
这时我们需要传入符合约束类型的值,必须包含必须的属性:
1 loggingIdentity({length : 10, value : 3}) ;
6.Partial
Partial 的作用就是将某个类型里的属性全部变为可选项 ?。
定义:
1 2 3 4 5 6 7 8 /**Make all properties in T optionaltype Partial <T > = {P in keyof T ]?: T [P ];
在以上代码中,首先通过 keyof T 拿到 T 的所有属性名,然后使用 in 进行遍历,将值赋给 P,最后通过 T[P] 取得相应的属性值。中间的 ? 号,用于将所有属性变为可选。
示例:
1
2
3
4
5
6
7
8
9
10
11
12
13
14
15
16
17
18
19
20
21
22
23
24
interface Todo {string ;string ;function updateTodo (todo: Todo, fieldsToUpdate: Partial<Todo> ) return { ...todo, ...fieldsToUpdate };const todo1 = {"organize desk" ,"clear clutter" ,const todo2 = updateTodo(todo1, {"throw out trash" ,string | undefined ;string | undefined ;
八、TypeScript 装饰器 13.1 装饰器是什么
它是一个表达式
该表达式被执行后,返回一个函数
函数的入参分别为 target、name 和 descriptor
执行该函数后,可能返回 descriptor 对象,用于配置 target 对象
13.2 装饰器的分类
类装饰器(Class decorators)
属性装饰器(Property decorators)
方法装饰器(Method decorators)
参数装饰器(Parameter decorators)
13.3 类装饰器
1
2
3
declare type ClassDecorator = <TFunction extends Function >( target: TFunction void ;
类装饰器顾名思义,就是用来装饰类的。它接收一个参数:
target: TFunction - 被装饰的类
1
2
3
4
5
6
7
8
9
10
11
12
13
14
15
function Greeter (target: Function ): void function (void console .log("Hello Semlinker!" );@Greeter class Greeting constructor (let myGreeting = new Greeting();
上面的例子中,我们定义了 Greeter 类装饰器,同时我们使用了 @Greeter 语法糖,来使用装饰器。
友情提示:读者可以直接复制上面的代码,在 TypeScript Playground 中运行查看结果。
有的读者可能想问,例子中总是输出 Hello Semlinker! ,能自定义输出的问候语么 ?这个问题很好,答案是可以的。
具体实现如下:
1
2
3
4
5
6
7
8
9
10
11
12
13
14
15
16
17
function Greeter (greeting: string ) return function (target: Function ) function (void console .log(greeting);@Greeter ("Hello TS!" )class Greeting constructor (let myGreeting = new Greeting();
13.4 属性装饰器
1
2
declare type PropertyDecorator = (target:Object ,string | symbol ) => void ;
属性装饰器顾名思义,用来装饰类的属性。它接收两个参数:
target: Object - 被装饰的类
1
2
3
4
5
6
7
8
9
10
11
12
13
14
15
16
17
18
19
20
21
22
23
24
25
26
27
28
29
30
31
32
33
34
35
36
37
38
39
40
41
42
43
44
function logProperty (target: any , key: string ) delete target[key];const backingField = "_" + key;Object .defineProperty(target, backingField, {true ,true ,true const getter = function (this : any const currVal = this [backingField];console .log(`Get: ${key} => ${currVal} ` );return currVal;const setter = function (this : any , newVal: any console .log(`Set: ${key} => ${newVal} ` );this [backingField] = newVal;Object .defineProperty(target, key, {true ,true class Person @logProperty public name: string ;constructor (name : string )this .name = name;const p1 = new Person("semlinker" );"kakuqo" ;
以上代码我们定义了一个 logProperty 函数,来跟踪用户对属性的操作,当代码成功运行后,在控制台会输出以下结果:
1
2
Set: name =>name =>
13.5 方法装饰器
1
2
declare type MethodDecorator = <T>(target:Object , propertyKey : string | symbol,void ;
方法装饰器顾名思义,用来装饰类的方法。它接收三个参数:
1
2
3
4
5
6
7
8
9
10
11
12
13
14
15
16
17
18
19
20
21
22
23
24
25
26
27
28
29
30
31
32
33
34
35
36
target: Object - 被装饰的类string | symbol - 方法名function LogOutput (tarage: Function , key: string , descriptor: any ) let originalMethod = descriptor.value;let newMethod = function (...args: any [] ): any let result: any = originalMethod.apply(this , args);if (!this .loggedOutput) {this .loggedOutput = new Array <any >();this .loggedOutput.push({new Date ()return result;class Calculator @LogOutput number ): number {return num * 2 ;let calc = new Calculator();11 );console .log(calc.loggedOutput);
13.6 参数装饰器
1
2
declare type ParameterDecorator = (target: Object , propertyKey : string | symbol,number ) => void
参数装饰器顾名思义,是用来装饰函数参数,它接收三个参数:
1
2
3
4
5
6
7
8
9
10
11
12
13
14
15
16
17
18
target: Object - 被装饰的类string | symbol - 方法名number - 方法中参数的索引值function Log (target: Function , key: string , parameterIndex: number ) let functionLogged = key || target.prototype.constructor.name;console .log(`The parameter in position ${parameterIndex} at ${functionLogged} has been decorated` );class Greeter string ;constructor (@Log phrase: string this .greeting = phrase;
介绍完 TypeScript 入门相关的基础知识,猜测很多刚入门的小伙伴已有 “从入门到放弃” 的想法,最后我们来简单介绍一下编译上下文。
九、编译上下文 14.1 tsconfig.json 的作用
用于标识 TypeScript 项目的根路径;
用于配置 TypeScript 编译器;
用于指定编译的文件。
14.2 tsconfig.json 重要字段
files - 设置要编译的文件的名称;
include - 设置需要进行编译的文件,支持路径模式匹配;
exclude - 设置无需进行编译的文件,支持路径模式匹配;
compilerOptions - 设置与编译流程相关的选项。
14.3 compilerOptions 选项
compilerOptions 支持很多选项,常见的有 baseUrl、 target、baseUrl、 moduleResolution 和 lib 等。
compilerOptions 每个选项的详细说明如下:
1 2 3 4 5 6 7 8 9 10 11 12 13 14 15 16 17 18 19 20 21 22 23 24 25 26 27 28 29 30 31 32 33 34 35 36 37 38 39 40 41 42 43 44 45 46 47 48 49 50 51 52 53 {"compilerOptions" : {"target" : "es5" , "module" : "commonjs" , "lib" : [], "allowJs" : true , "checkJs" : true , "jsx" : "preserve" , "declaration" : true , "sourceMap" : true , "outFile" : "./" , "outDir" : "./" , "rootDir" : "./" , "removeComments" : true , "noEmit" : true , "importHelpers" : true , "isolatedModules" : true , "strict" : true , "noImplicitAny" : true , "strictNullChecks" : true , "noImplicitThis" : true , "alwaysStrict" : true , "noUnusedLocals" : true , "noUnusedParameters" : true , "noImplicitReturns" : true , "noFallthroughCasesInSwitch" : true , "moduleResolution" : "node" , "baseUrl" : "./" , "paths" : {}, "rootDirs" : [], "typeRoots" : [], "types" : [], "allowSyntheticDefaultImports" : true , "sourceRoot" : "./" , "mapRoot" : "./" , "inlineSourceMap" : true , "inlineSources" : true , "experimentalDecorators" : true , "emitDecoratorMetadata" : true
引用文章 1.2W字 | 了不起的 TypeScript 入门教程