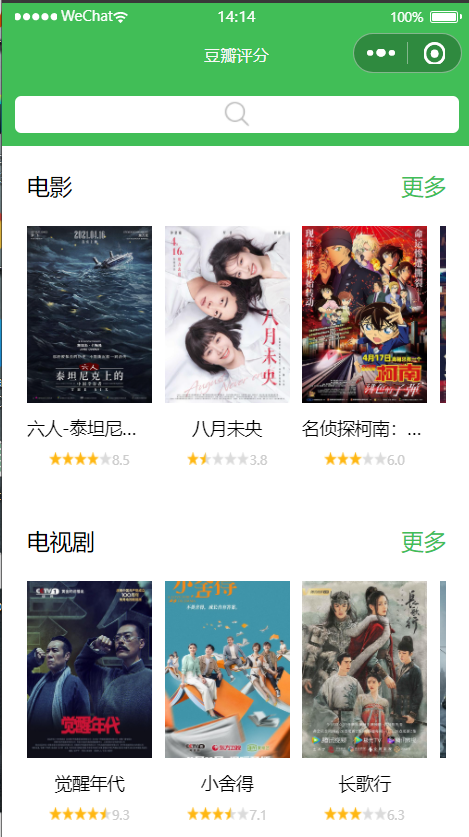
首页布局和数据获取
- 将电影中假的数据变成真的数据(wx.request请求Api)
首页js文件中获取,在onLoad中请求数据,这个页面一旦加载完毕就去请求
index.js
1
2
3
4
5
6
7
8
9
10
11
12
13
14
15
16
17
18
19
20
21
22
23
24
25
26
27
28
29
30
31
32
33
34
35
36
37
38
39
40
41
42
43
44
45
46
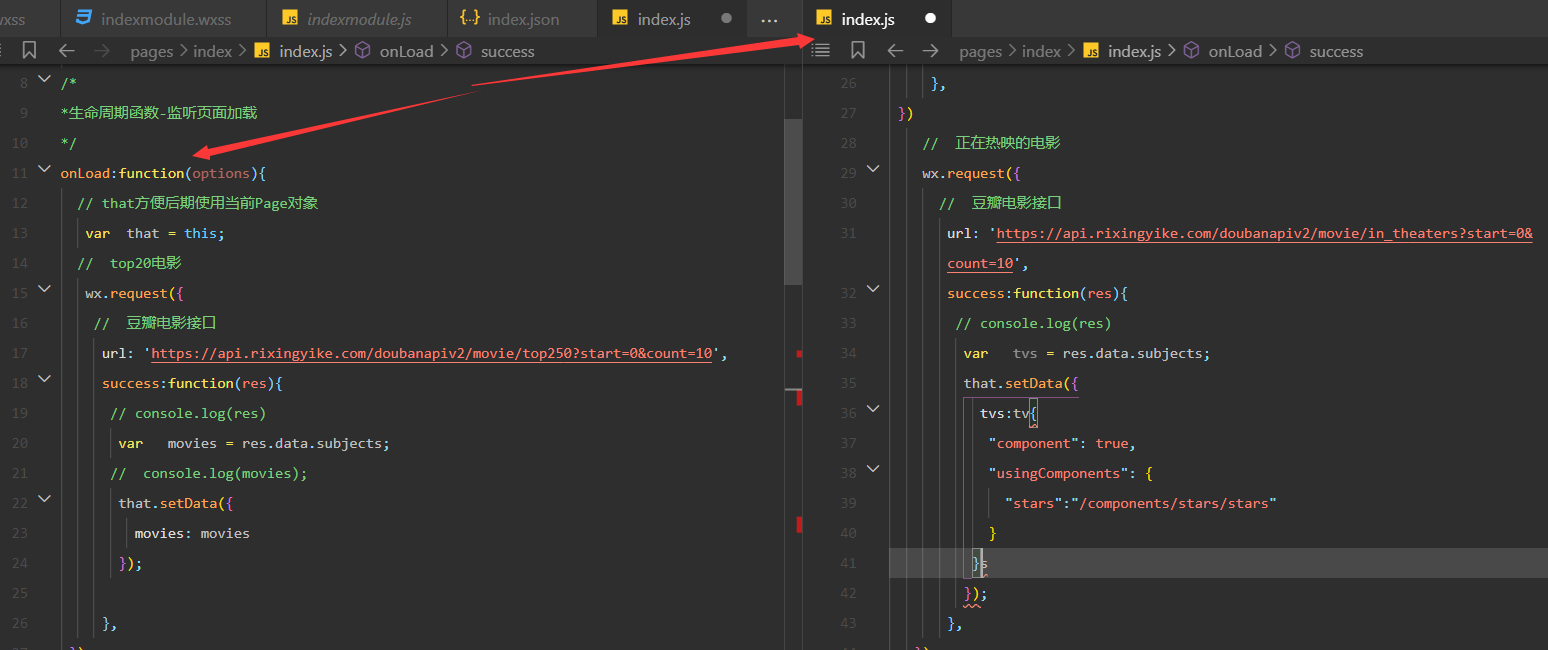
| /*
*生命周期函数-监听页面加载
*/
onLoad:function(options){
// that方便后期使用当前Page对象
var that = this;
// top20电影
wx.request({
// 豆瓣电影接口
url: 'https://api.rixingyike.com/doubanapiv2/movie/top250?start=0&count=10',
success:function(res){
// console.log(res)
var movies = res.data.subjects;
// console.log(movies);
<!-- 保存movies数据 -->
that.setData({
movies: movies
});
},
})
// 正在热映的电影
wx.request({
// 豆瓣电影接口
url: 'https://api.rixingyike.com/doubanapiv2/movie/in_theaters?start=0&count=10',
success:function(res){
// console.log(res)
var tvs = res.data.subjects;
that.setData({
tvs:tvs
});
},
}),
// 即将上映的电影
wx.request({
// 豆瓣电影接口
url: 'https://api.rixingyike.com/doubanapiv2/movie/coming_soon?start=0&count7',
success:function(res){
// console.log(res)
var shows = res.data.subjects;
that.setData({
shows:shows
});
},
})
}
|
由于豆瓣Api不对外开放,以上Api是我从网上得到进行处理的,部分数据加载不出来。
测试版本微信要勾选不校验合法域名才能网上获取数据

补充
wx:key作用:
如果列表中项目的位置会动态改变或者有新的项目添加到列表中,并且希望列表中的项目保持自己的特征和状态(如 <input/> 中的输入内容, <switch/> 的选中状态),需要使用 wx:key 来指定列表中项目的唯一的标识符。
wx:key 的值以两种形式提供:
- 字符串或者数字,代表在 for 循环的 array 中 item 的某个 property,该 property 的值需要是列表中唯一的字符串或数字,且不能动态改变。在写的时候,直接写这个 property 的名字就可以了,不需要写 item.property 的形式,并且不需要加中括号。
- 保留关键字 this 代表在 for 循环中的 item 本身,这种表示需要 item 本身是一个唯一的字符串或者数字,如:当数据改变触发渲染层重新渲染的时候,会校正带有 key 的组件,*框架会确保他们被重新排序,而不是重新创建,以确保使组件保持自身的状态,并且提高列表渲染时的效率。
setData
如果以后想要修改 data 中的值,应该使用 setData 方法。 setData 函数用于将数据从逻辑层发送到视图层(异步),同时改变对应的 this.data 的值(同步)。注意事项:
- 直接修改 this.data 而不调用 this.setData 是无法改变页面的状态的,还会造成数据不一致。
- 放到 data 中的值,只能使用可以 JSON 序列化的:字符串,数字,布尔值,对象,数组。否则将不会渲染。
- 其中 key 可以以数据路径的形式给出,支持改变数组中的某一项或对象的某个属性,如
array[2].message , a.b.c.d ,并且不需要在 this.data 中预先定义。
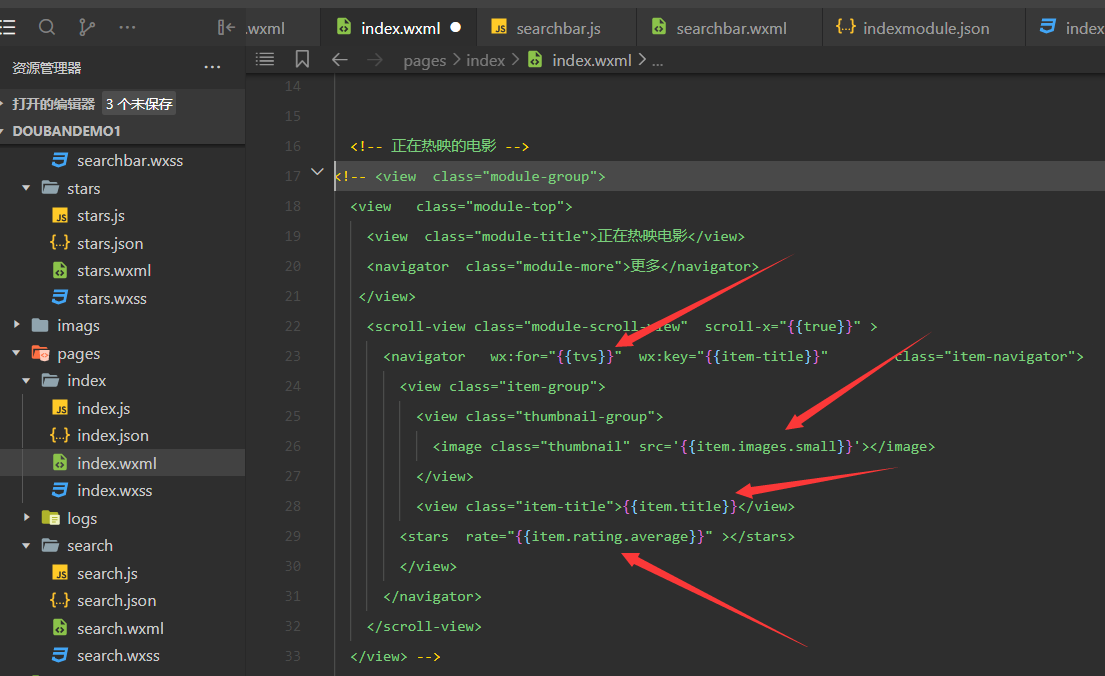
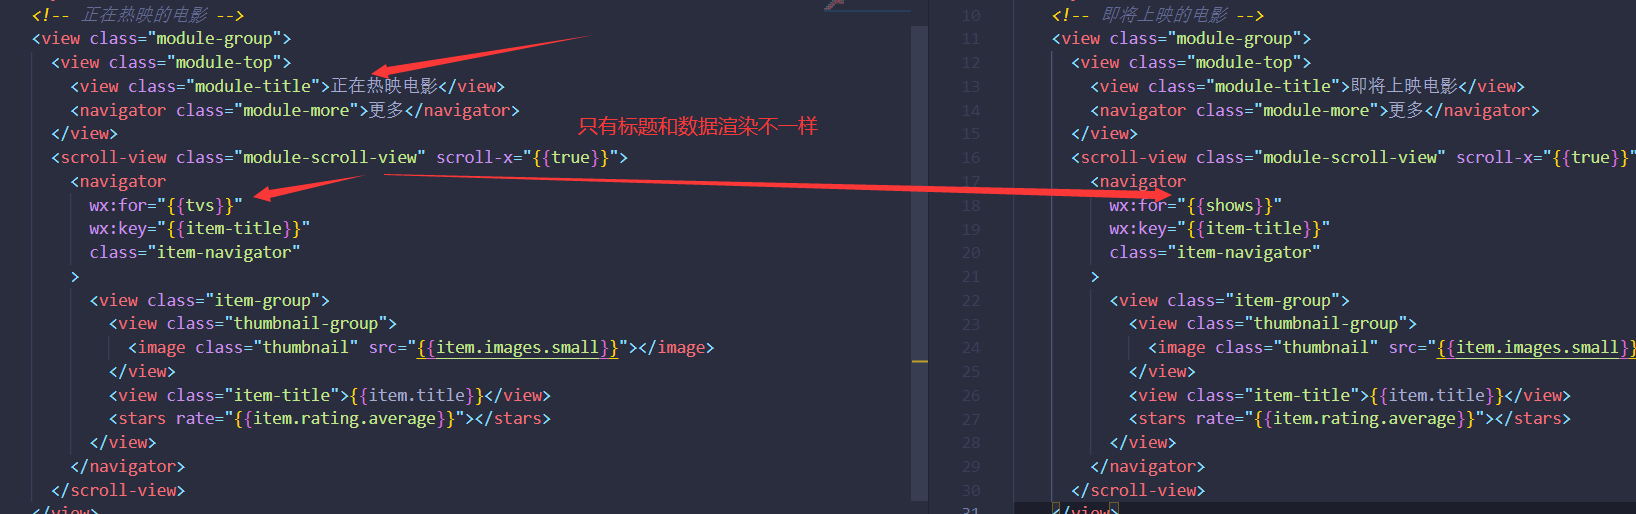
首页模块重构

分析:首页三个模块中90%以上的代码都是重复的,我们可以把它给重构
把不同的东西提取出来,通过变量的方式表示,将以上一个模块做成一个组件。然后做成三个属性{电影,更多,循环的movies}
- 在components中新建一个indexmodules组件
将index.wxml中的代码剪切到indexmodules.wxml中
1
2
3
4
5
6
7
8
9
10
11
12
13
14
15
16
17
18
| <view class="module-group">
<view class="module-top">
<view class="module-title">{{title}}</view>
<navigator url="{{moreurl}}" class="module-more">更多</navigator>
</view>
<scroll-view class="module-scroll-view" scroll-x="{{true}}" >
<navigator wx:for="{{items}}" wx:key="{{item-title}}" class="item-navigator">
<view class="item-group">
<view class="thumbnail-group">
<image class="thumbnail" src='{{item.images.small}}'></image>
</view>
<view class="item-title">{{item.title}}</view>
<stars rate="{{item.rating.average}}" ></stars>
</view>
</navigator>
</scroll-view>
</view>
|
将index.wxss中的代码剪切到indexmodules.wxss中
1
2
3
4
5
6
7
8
9
10
11
12
13
14
15
16
17
18
19
20
21
22
23
24
25
26
27
28
29
30
31
32
33
34
35
36
37
38
39
40
41
42
43
44
45
46
47
48
49
50
51
52
53
54
55
56
57
|
.module-group{
padding: 40rpx;
background-color: #fff;
}
.module-group .module-top{
font-size: 36rpx;
display: flex;
justify-content: space-between;
}
.module-top .moudle-title{
color:#494949;
}
.module-top .module-more{
color: #41be57;
}
.module-scroll-view{
margin-top: 40rpx;
width: 100%;
height:400rpx;
white-space: nowrap;
}
.module-scroll-view .item-navigator{
width:200rpx;
margin-right: 20rpx;
display: inline-block;
}
.module-scroll-view .item-navigator:last-of-type{
margin-right: 0;
}
.item-navigator .item-group{
width: 100px;
}
.item-group .thumbnail-group{
width: 100%;
height: 284rpx;
}
.thumbnail-group .thumbnail{
width: 100px;
height: 100%;
}
.item-group .item-title{
font-size: 28rpx;
text-align: center;
margin-top: 20rpx;
text-overflow:ellipsis;
overflow: hidden;
}
|
- 将要渲染的数据定义成三个属性
indexmodules.js文件中
1
2
3
4
5
6
7
8
9
10
11
12
13
14
15
16
17
18
|
properties: {
title:{
type:String,
value:""
},
moreurl:{
type:String,
value:""
},
items:{
type:Array,
value:[]
}
},
|
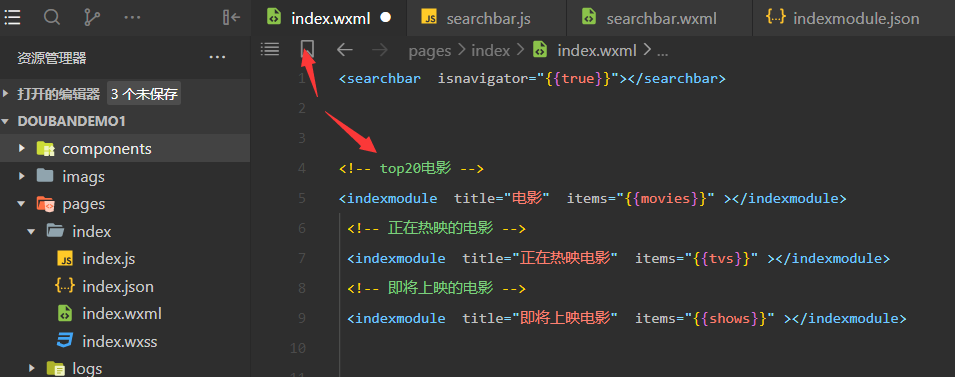
- 组件引用
index.json文件中
1
2
3
4
5
6
7
| {
"usingComponents": {
"searchbar":"/components/searchbar/searchbar",
"stars":"/components/stars/stars",
"indexmodule":"/components/indexmodule/indexmodule"
}
}
|
- 组件使用
1
2
3
4
5
6
7
|
<indexmodule title="电影" items="{{movies}}" ></indexmodule>
<indexmodule title="正在热映电影" items="{{tvs}}" ></indexmodule>
<indexmodule title="即将上映电影" items="{{shows}}" ></indexmodule>
|
- 问题:此时评分不见了stars是放在indexmodule中使用,所以要在indexmodule.js中引用一下stars组件
1
2
3
4
5
6
| {
"component": true,
"usingComponents": {
"stars":"/components/stars/stars"
}
}
|
此时页面效果和之前一样了
网络请求模块重构
对index.js中的网络请求代码进行重构
- index.js中只有这些网路请求的代码
- 代码重复较多
- MVC思想 Model(数据data) View(html,css) Controller(控制器,起到指挥的作用,具体怎么去实现交给专门的模块,可以比喻成交警指挥交通并不会去开车)
处理方法
- 将网络请求放入一个network.js文件中去完成
将index.wxml中的request请求剪切到network.js中
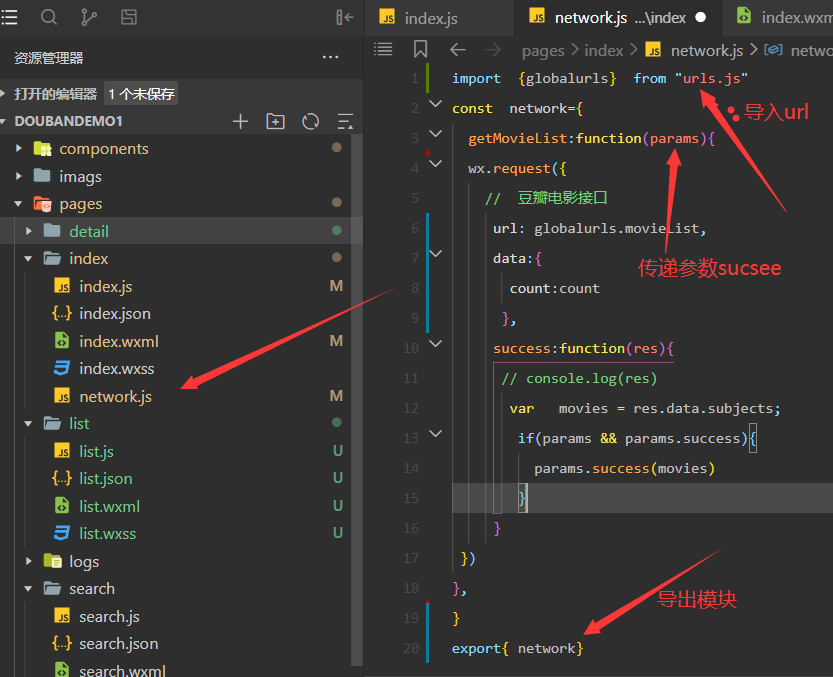
- index.js 导入模块 import {network} from “../../utils/network.js”
代码处理,存储数据,其他模块进行相同处理
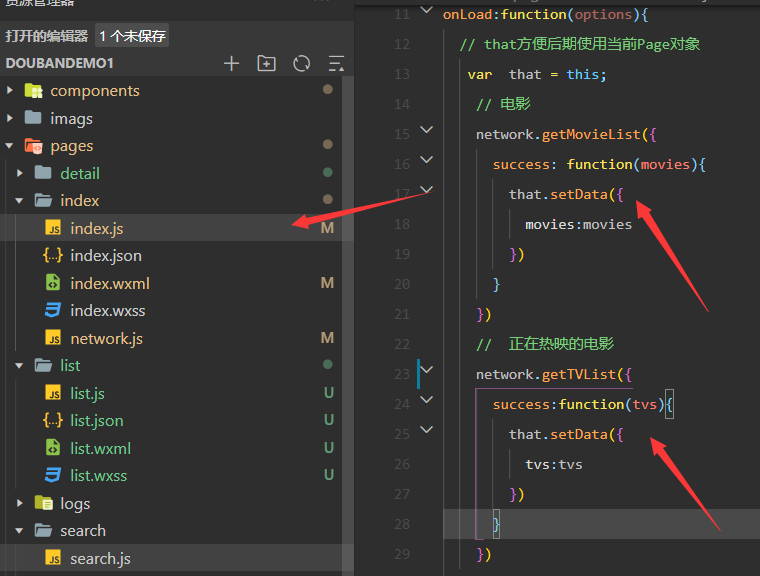
这时候index.js就起到了一个控制器的作用,不会起到网络请求的的作用,真正的网络请求在network.js文件中。我们只负责调用。
考虑到后期我们点击更多列表页使用的ur和首页的url是一样的,所以我们可以把url链接单独抽取出来。
在utils文件中单独创建一个文件用来存储这些链接urls.js
1
2
3
4
5
6
| const globalurls={
movieList: "https://m.douban.com/rexxar/api/v2/subject_collection/movie_showing/items",
tvList: "https://m.douban.com/rexxar/api/v2/subject_collection/tv_hot/items",
showList: "https://m.douban.com/rexxar/api/v2/subject_collection/tv_variety_show/items",
}
export {globalurls}
|
network.js文件中修改代码
1
2
3
4
| url: globalurls.movieList,
data:{
count:7
},
|
重构后首页效果与之前一样
由于我的Api换了,所以数据发生了一些变化,之前代码一些数据获取代码可能之后不同